Mohave Gambler
One of the advantages of having a gun store as a client for my consulting business is that I am occasionally given the opportunity to pick up some relevant junk before it goes into the trash. This article is about a treasure that was given to me. It arrived as a bag of old parts that could be assembled into a reproduction of a Second Model Colt's Dragoon that was made by Ami San Marcos. I reassembled the gun from the parts and found that all parts were there or there was evidence they had been destroyed through modifications by a previous owner.
The overall condition of the gun was pretty bad. Someone had done an action job on the hammer sear by using a bench grinder, but there was still enough metal to allow me to reshape the sear, repair the damage, and case harden the sear. The loading lever appeared to have been damaged so someone had brazed a bracket on the right side to fashion their own loading lever. Significant rust and pitting was evident in the chambers.
I would have set out to restore this Cap and Ball revolver if it had been an original Colt, but it was a reproduction of questionable quality. This gun had probably seen its best days and it would have been time to put it to rest until I made a few measurements of the chambers. I measured the pitted and rusted chambers as having a .448 diameter. A little time was spent measuring .45 Colt casings and rims revealed that the Dragoon cylinder could be bored to the .475 diameter needed to convert this revolver to chamber the modern ammunition.
I did some research and learned that the Dragoon was not a popular cartridge conversion candidate. This was probably because if its size, weight, and because it had to be custom converted by a gunsmith. Even converting this gun to a .45 caliber cartridge reduces its power. The original Dragoon was shot with 50 grains of blackpowder with a .451 or .454 round ball. I believe the Dragoon was shot with 40 grains of blackpowder when using conical bullets. This means the gun was designed for both types of bullet. I feel it would be necessary to limit the gun to firing blackpowder loads of less than 40 grains for safety, but the project might be feasible.
Dragoon Project Statement
I start a project with the end result described in writing so I can then work toward my vision. This project will convert the Second Model Dragoon to a .45 Colt Cartridge revolver. This will be done by removing the bluing, removing all modifications made by a past owner, cutting a loading port in the recoil shield, turning the cylinder down with a lathe, boring the chambers to accept the cartridges, making a backing plate ring, modifying and repairing the hammer, fabricating an extractor mechanism, and fashioning new grips.
Certain components of this project are not decided as I begin. The extractor housing and its attachment are not decided upon and will be designed when more important components of the project have been finished. The conversion work will be done in a way that simulates the 1851 Navy conversions, but there is no historical precedent for the Dragoon conversion. I believe this revolver would look best with a nickel finish and white grips. Other finishing options include either a rust brown or rust blue finish with new walnut grips. These decisions will be made as the project unfolds.
I did take a photograph the recoil shied marked out with tape before beginning this project, but I made the mistake of removing the bluing before taking any overall pictures. The first task was to remove the bluing in order to evaluate the frame. The barrel was not only blued, but was also painted. I used paint remover followed by Navel Jelly to remove the black paint and the underlying bluing. Navel Jelly was somewhat effective at removing the case color on the frame of the gun. All parts were cleaned and the brass backstrap was placed in my vibrator cartridge brass cleaner and polisher.
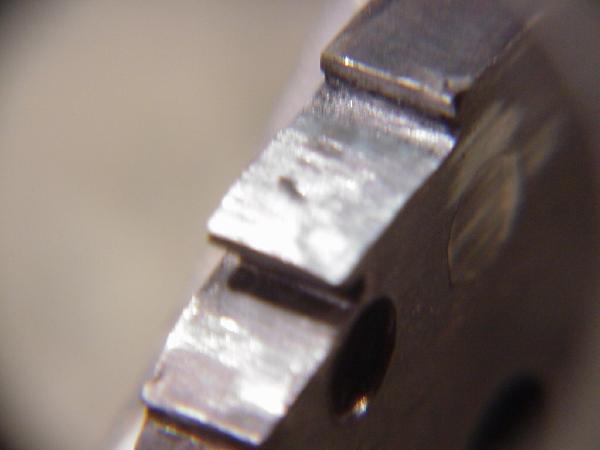
I began the project with an evaluation of the frame. It was sound with no stretching of the arbor. There was a slight dimpling on the left side and serious damage on the right side where some kind of bracket had been installed by brazing. One person has speculated that a direct loading ram may have been installed here to allow the pounding of lead balls into the cylinders. They strengthened this bracket by grinding a relief into the frame before brazing. If the recess cannot be used or hidden by the new cartridge extractor, it will have to be welded and filed. In the meantime, the right side of the frame will have to be filed until the excess metal has been removed. Please see Fig 1 to see the extent of the damage.
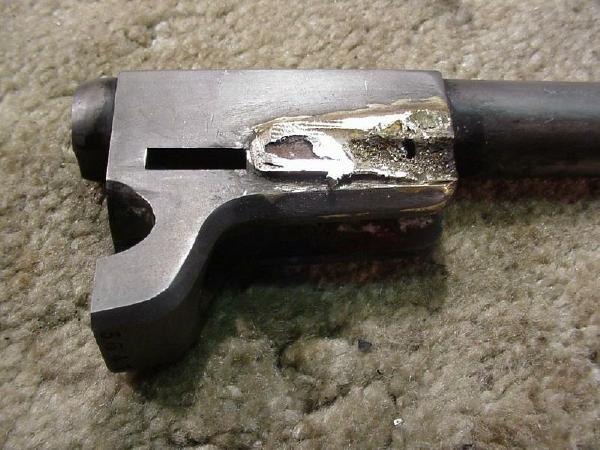 |
Fig 1. The right side of the barrel assembly showing where a bracket had been brazed into place. |
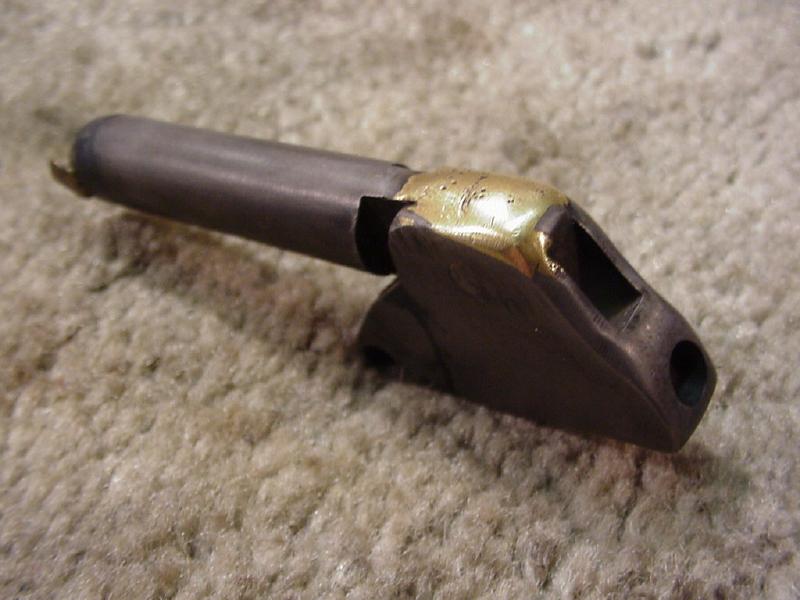
Figure 2 illustrates where the previous owner has brazed the old loading assembly into a solid mass after the loading lever broke. This part will have to be cleaned up and rebuilt in order to provide a detachable arm for mounting the extractor housing. The following pictures illustrate the work done on this component. An additional description of the process will be added after it is completed.
|
|
Fig 2. The damaged loading lever. |
|
|
Fig 3. The recoil shield is laid out with tape to mark the area that must be cut back to form the cylinder loading port. A rattail file, a Dremmel tool, and sandpaper on a cartridge was used to remove the metal and polish the port. |
|
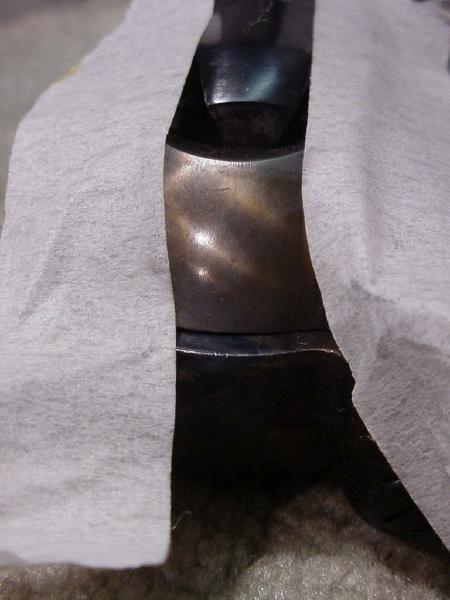
The recoil shield must be recessed in order to provide the ability to load and unload the cylinders. I marked the approximate area with tape for the photo above prior to doing any work on the gun. I began the process by removing the bluing from the gun and then applying Dykem, which is used to turn the metal blue so that lines can be scribed in the steel as a guide to cutting metal away. I used a rattail file to cut away most of the material needed and to provide a rough opening for the loading port. I then used the Dremmel tool with a carbide cutter and sanding attachments to make a very smoothly contoured port. Final finishing of the port was done with a cartridge casing wrapped with emery cloth.
|
|
|

|
|
Site Design By Time-Slice Check Us Out.....