|
By:
|
|
The Mohave Gambler
|
|
Disclaimer: This is written as a guideline
for those who are skilled enough to complete this work. These modifications
are advisory in nature and I assume no liability for the outcome on your
guns. Make sure that any gun you work on is unloaded and check it each
time you work with it. Nobody ever planned an accident. You have
the last word on any modifications, especially the removal of any safety
devices that might be a part of your firearm. |
|
Background on
the Winchester 1894 Trapper
|
|
The 1894 Winchester lever action rifle was specifically designed by John Moses
Browning as the first lever action rifle to be marketed for use with the new
smokeless powders. The 94 has been in nearly continuous production since
1894, which makes it one of the most successful products in history. This gun makes a fine entry level Cowboy Action lever gun and new
owners of these successful rifles will want to know how to slick them up so
they shoot better. Unfortunately, the current design of this stout rifle
does not lend itself to being turned into a finely tuned shooter without some
major modifications that are beyond the scope of this article. |
|

|
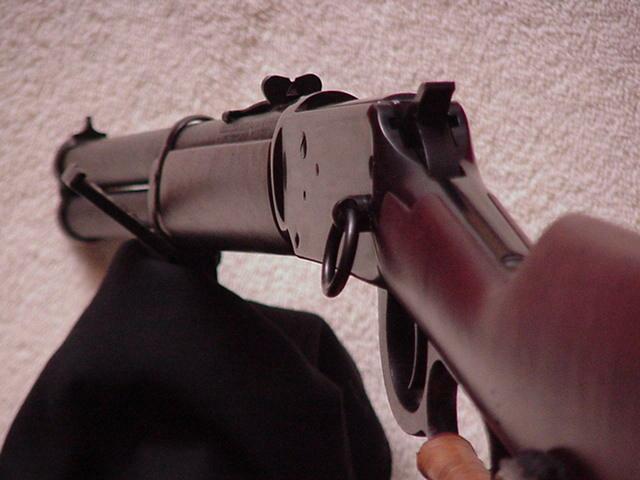
Figure 1. Here is
a picture of the Winchester New Model 94 Trapper that I use for competition.
This was taken after the modifications were complete. |
|
The Winchester was originally designed for the longer casings of
more traditional
rifle ammunition and many argue that its linage prevents the action from
being optimal for the shorter cartridges of the newer models. The
design and manufacturing methods have have evolved to make it more
attractive in a competitive market, a cross-bolt safety was added that can
cause problems, and the trigger and hammer assembly were modified from the
original design. The Winchester model 94 in this tutorial is a nine-shot Trapper in .44 Magnum
caliber. It has been used in Cowboy Action Shooting with mixed results
and improvements were warranted. The trigger was a
little heavy and the action was somewhat stiff. |
|
I selected the Winchester 94 Trapper because the price was attractive, it
had a long history, and there was no significant advantage to buying a longer gun in the
state of California. I looked at other models, but California law
defined any rifle with a magazine in front of the trigger and a capacity of
more than nine rounds as an illegal assault weapon. With a felony of
putting more than nine in the tube, I went with the Trapper. That law
was changed in 2002 to allow tube feed magazines to exceed the nine round
limit. The change in the law allows me to increase the capacity of the
Trapper if it is possible. |
| Although the Winchester 94 has been in production since 1896, they made
significant changes to the gun at serial number 4,580,000, which appears to
be the point when they changed from a leaf hammer spring to a coil hammer
spring. I understand that additional changes were made at
around serial number 6,000,000, which appears to be the change to a
rebounding hammer
and the the addition of the cross-bolt safety. |
|
Winchester
1894 Trapper Project Statement
|
|
To clean up the action
on a modern 94 Trapper so it shoots better for Cowboy Action Shooting.
This will be done using simple tools and techniques. I will also see if
it is possible to correct the overall problem of the basic design of the
hammer and trigger assembly and will see if it is possible to modify the
magazine to allow the storage of ten rounds.
|
|
|
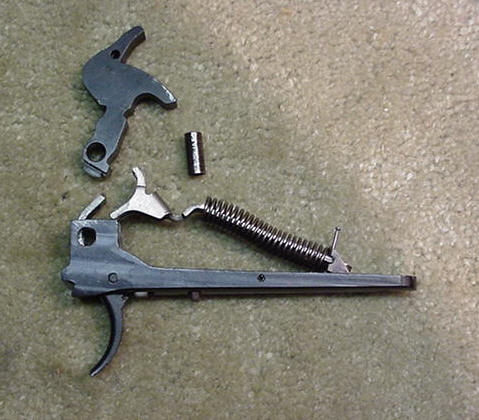
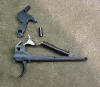
Figure 2. The
Winchester 94 trigger and hammer assembly. Note the coiled
mainspring and the fork with its two hammer contact points that create a
cradling effect that forces the hammer back away from the firing pin when it
is at rest. Click on the picture to enlarge it. |
|
Understanding
this Gun
|
|
There are many people who claim the 94 cannot be cleaned
up and turned into a good rifle. I feel this is an inappropriate
argument, because the most common use for this rifle is Cowboy Action
Shooting (CAS) and hunting. Let's face some CAS facts. The 94
does have design limits that prevent it from being a premier action rifle,
however, most CAS shooters are not top contenders. Most people are in
the sport for fun and can benefit from having a reasonably priced and
reliable gun that is also very strong. |
|
To better understand the trigger and hammer function of
the modern 94, please click on the thumbnail in figure 2. Study the
lower tang assembly. Note the hammer spring guide rod with a two prong
fork on the forward end (left) retains the coil mainspring. Note the
two indentations on the rear of the hammer. The two prongs of the
hammer spring guide rod ride in those two indentations. When the
hammer is cocked, the pivoting action of the hammer causes only the top
prong of the hammer spring guide rod to engage the hammer. The
distance (leverage) from the hinge pin to drive the hammer forward is
sufficient to drive the hammer forward and strike the firing pin. When
the hammer is cocked, the pressure on the upper part of the hammer is much
like that of any hammer and spring combination. Cocking the hammer
also engages the sear, which holds the hammer in the full cock position
until the trigger is pulled. There is no half-cock notch on this rifle
and there is no need for one as long as we do not modify the design of the
trigger and hammer. |
| It is important to understand that the hammer and trigger sears do not come
in contact with each other on the New Model 94. There is a lever
safety that protrudes through the lower tang and must be depressed by the
lever in order to release the hammer. Essentially, the trigger engages
the lever safety and the lever safety engages the hammer sear. This is
the cause of one of the biggest problems with the New Model 94, which causes
the trigger to have over a half inch of travel before engaging anything.
Do not tamper with this safety feature because it prevents the gun from
firing before the bolt is securely locked in place. |
| I think of the New Model 94 as having three hammer positions: resting,
striking, and cocked. In the resting position, both the upper and
lower prongs of the hammer spring guide rod are in contact with the
appropriate recesses in the hammer. A balance between the two cause
the hammer to remain centered and away from the firing pin. This is
needed to allow the cross-bolt safety to be engaged without being obstructed
by the hammer. When the hammer has been pushed or pulled to the rear
and is engaging the sear, it is in the cocked position. Pulling the
trigger moves the hammer forward to momentarily strike the firing pin.
I call this the striking position. |
| When the hammer is cocked and the trigger pulled, the hammer is released and
pushed forward by the energy of the coil spring exerting pressure on the
upper part of the hammer through the upper prong of the hammer spring guide
rod. The hammer accelerates forward until it reaches the rest position
and the lower prong of the hammer spring guide rod engages the lower notch
in the hammer. The lower notch is slightly below the hammer pivot
bushing so it exerts a slight force to slow the hammer as the hammer moves
forward. As the lower prong engages the lower slot, the upper prong of
the hammer spring guide rod disengages and stops providing any more forward
energy. Between the resting and striking positions, the hammer is
moving forward only from its own forward inertia and there is a very slight
slowing action from the lower prong in its notch. The hammer strikes
the firing pin and the cartridge is fired. |
| What does all of this mean? It means there are a lot of parts
moving around in that trigger assembly and a lot of mass and inertia needed.
It means that the Winchester New Model 94 will shoot safely and reliably in
a variety of weather conditions for hunting. It also means it is not
the most suitable design for CAS, but it is certainly good enough for most
cowboy action shooters. |
| Is this simply not the right gun for CAS competition? That depends on
your point of view. The top shooters will use expensive toggle-bolt
rifles that have been slicked by the best smiths in the country, so this is
not a gun for them. I think this is a good gun for the rest of us who are
content with having a fun day. For us, the difference between a
Winchester 94 and a perfect rifle will be only a second or two in total
stage time, which does not matter to most of us. The good news is that this gun can
be improved a little in just a few hours. I have determined that it is
possible to custom build a new trigger and hammer for the gun, but the
effort would be so great that it's probably better to simply buy a different
gun and use the 94 as a backup if the perfect trigger is needed. I may
create a project to illustrate how to make these changes, but they are
probably not warranted. |
|
Making
the modifications
|
| There are several places where the Winchester 94 can be improved.
Improvements are simple and can be made in the sear, the hammer spring, the
magazine spring, and the cross-bolt safety. Begin by removing the
stock from the tang. This is done by removing the tang screw from the
upper tang and pulling the stock to the rear to remove it. This will
expose the upper and lower tangs and you will note the lower tang is loose
and held only by the hammer pivot screw. Remove the hammer pivot screw
from the left side of the receiver and the entire lower tang assembly can be
removed out the bottom by carefully lowering the assembly to the rear.
It may take a little experimentation with the hammer position to remove it,
but it will come out. |
| The hammer is held in position by the bushing that runs through the hammer
pivot hole. Cock the hammer back to expose a hole in the hammer spring
guide rod and place a small pin or nail into the hole. This will hold
the spring in place until you need to remove it. Drift the hammer
pivot bushing out with a drift punch, but it should only require a little
pressure since it is not a press fit. Remove the hammer and you will
find the sear and ramp on the bottom. Using a stone or some 600 grit
wet or dry sandpaper on a flat surface, polish any machine marks down to
reduce friction. It is not necessary to create a mirror finish, but
removing rough spots will help. It may also help to lightly polish the
sides of the hammer where they contact the receiver. Don't forget to
lightly polish any roughness on the receiver where the hammer is in contact. |
|

|
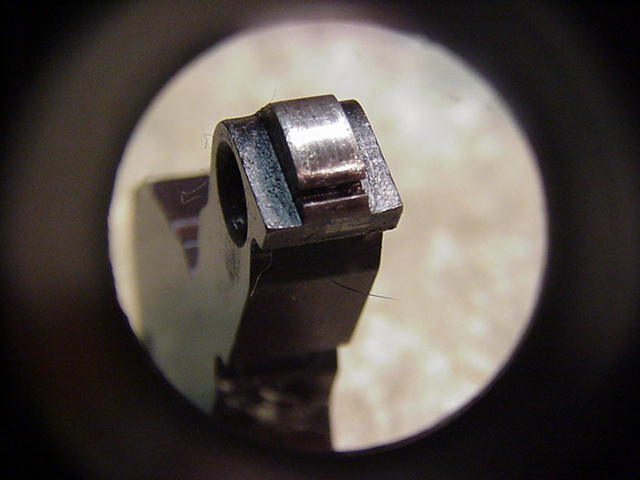
Figure 3. The
hammer sear after it has been polished. This improves the feel of the
hammer as it is pulled with the thumb or the bolt. |
| Take some wet or dry sandpaper and gently polish the outside surface of the
hammer pivot bushing and the inside of the hammer pivot hole. I wrap
the 600 grit paper around a drift punch and use the drift punch to polish
the inside of the hole. It only takes a few strokes to remove the
rough spots, but you do not want to remove enough material to increase the
play of the bushing. |
| It's now time to make a decision. You can stop and coat all of the
friction surfaces with action grease, or you can take the parts further
apart and do more polishing. I took mine completely apart and
polished each part where they contact another part, but there is so little
movement in the parts that I would probably just use grease and move on if I
had it to do again. It is up to you. |
| Now for an important step. Carefully compress the hammer spring,
remove the retaining pin, and remove the hammer spring guide rod and the
hammer spring. Note the orientation of the hammer spring guide rod
because it's easy to reassemble it upside down. I am not aware of any
spring kits for the 94 so I removed four coils from the coil mainspring on
the advice of some people who have done it. I also polished the hammer
spring guide rod so the spring would not tend to bind on any rough spots.
There were some rough points on the prongs that contact the hammer so I
lightly polished those with 600 grit sandpaper. Reassemble the parts
back into the lower tang assembly and lube with an appropriate low-drag
grease. I used Brownell's Action Magic Lube Plus. |
|
After installing the lower tang assembly
and reinstalling the buttstock, I lubricated the gun as I normally would and
cycled the action. Reducing the spring tension reduced the force needed
to cock the hammer on the down stroke of the lever. The grease and
slight polishing seemed to make the trigger feel better and smoother.
Testing the gun with empty, but primed cases, told me that there was still
enough mainspring force to reliably detonate the primers. We will now
turn our attention to the magazine.
|
|
|
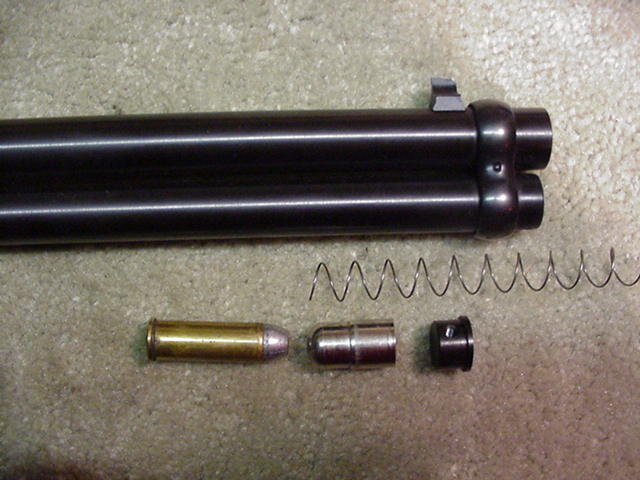
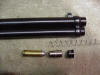
Figure 4. The magazine spring, the follower, the magazine tube cap,
and a cartridge in the proper orientation. |
|
I find the Winchester 94 to be a bit
difficult to load, because there is simply too much tension on the magazine
spring to get the last cartridges to feed easily. I removed some of the
tension by removing the magazine plug from the end of the barrel by removing
the small screw under the magazine tube about a quarter of an inch from the
muzzle end of the tube. Be sure to apply some inward pressure to
the magazine plug, because the magazine plug is under tension from the
magazine spring and it may damage the threads or cause the magazine plug and
spring to be launched across the room. I cut four coils off the magazine
spring and reinstalled it.
|
| My last modification was to remove the cross-bolt safety. It was not
difficult, but it is a personal decision that must be made by each owner.
I resisted this change for the first year I owned the gun, but finally
decided to remove it after loosing four shots in a match because the safety
was on. Laying a 94 on its side at the loading table often activates
the safety, which may not be noticed until it fails to shoot while on the
clock. |
 |
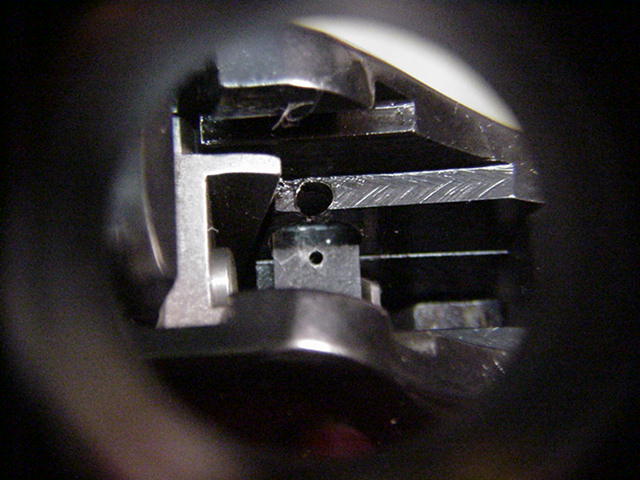
Figure 5.
The view looking down into the area between the firing pin and the hammer
while the hammer is in the cocked position. That flat platform with
the little hole is the safety bar. |
| I finally removed the safety from the gun to prevent any future problems.
Click on the photo in figure 5 to see a close-up view of the cross-bolt
safety and the release hole. The bright metal on the left of the image
is the breech bolt with the firing pin. The flat piece of steel in the
middle with a tiny hole is the safety. The large hole just above the
small hole is the access hole for getting the special tool into the small
hole in the safety so you can depress the spring loaded detent and remove
the safety bar. |
| If you are going to remove the safety, push the safety into the safe
position. This should align the little access hole with the larger
hole that gives you access to the access hole. You will need a special
tool that will fit into the access hole. I found a standard paper clip
to be a good fit. Using the paper clip, or any suitable tool, press
down into the hole and depress the detent and the detent spring. While
holding the detent down a little, push the safety on through from the left
side of the frame (from shooting position) and out the right side.
Once the safety bar moves about an eighth of an inch, it may hit a machining
mark and need a slightly more aggressive drifting out. Proceed carefully!
Remove the spring and detent, and save them for installation at a later
date. |
| Some people advocate modifying the safety so it does not work and then
putting it back into the frame to plug the holes . I feel it is
dangerous to use the rifle outside of CAS without the safety installed and
it might be carried with a round in the chamber. Cowboy Action
Shooting does not allow cartridges in the chamber except when the gun is
ready to fire. I feel it is worse to have a safety in place that does
not work. |
| The Winchester New Model 94 has a reputation for parts failures and for
actions that jam during shooting stages. I have had quite a few
problems, but most of them have been of my own doing or something other than
the gun. A common problem that has led to the reputation of this gun
is the fact that many people do not cycle the lever forcefully enough.
This action was designed to be worked with deliberation and a timid
operation of the action can cause problems. Treat it with respect and
don't abuse it, but operate the action with some authority and it will be
more reliable. |
| These modifications to my Winchester 94 Trapper have smoothed the action on
the gun and made it a lot easier to shoot in competition. There are a
lot more things that can be done, but this represents the total amount of
work I have done to mine. I am planning to make and install a brass
buckhorn rear sight. I am also planning to make a filler for the hole
left by the removal of the safety. I will add any additional
modifications to this article as they are completed. |
|
Site Design By
Time-Slice Check Us Out..... |